Category Archives: Internet

Fast uploads on NBN

I had been on Uniti Wireless for some years for home broadband. Costing $79/month, it was pretty good, and is the equivalent of NBN 50/20 speeds. But I really wanted faster uploads, and Uniti recently has had slow down problems, with speeds dropping randomly through the day. And twice this year it’s had outages.

Plus, since I joined Uniti, my street got NBN, opening up more options.

But I don’t understand why it’s so hard to find NBN plans with upload speeds of 40+ Mbps, and why they’re so expensive. You basically have to pay for 100 Mbps or higher downloads to get faster uploads.

Search sites like Finder have the option to look only for 50+ upload speeds, but then all it finds is one 250/50 plan costing $209/month, which is overkill.

Canstar only allows you to filter by download speeds. It does find one 100/40 plan from Belong, which Belong’s own web site doesn’t know about. Very helpful. Ditto TPG. The big companies, Telstra and Optus, don’t even offer fast uploads.

I found a reviews.org page that supposedly highlights fast uploads. Two of the five options listed are only 20 Mbps. Really?

Anyway, after some hunting around, here are a few options I found:

ProviderPlan Download/UploadInitial monthly costUsual monthly cost
Leaptel500/50$109 for first 12 months$129
Aussie Broadband100/40$109$109
iiNet450/40$119.99 for first 6 months$149.99
Superloop100/40$75 for first 6 months$89
Exetel100/40$74.99 for first 6 months$88.99

I’m sure there are more, but let’s not make the decision harder than it has to be.

As I understand it, Superloop and Exetel are the same company, which is why the pricing is near-identical. I’m somewhat suspicious of the amount of advertising Superloop is doing at the moment, and wonder if they have an influx of customers, what support will be like when something goes wrong.

My old provider, Uniti (using fixed wireless) has been pretty good but continually falls down with poor support when anything goes wrong.

iiNet I’ve used in the past and they were very good for support, and their service includes mobile internet as a backup during outages. But their only plan with 50+ upload is 450 download, which I don’t need, and is way more expensive any anything else.

But I ended up with Aussie Broadband, which has a very good reputation for good support. So far so good. 100+ downloads, 35-40 uploads.

Good by world standards? Probably not.

But fine for AU. I’m happy with that for now.

Refreshing Facebook link previews

Sometimes when posting a link, something goes wrong and the preview doesn’t come up properly.

I hit this issue yesterday when posting a link from my personal blog. At the FB probe went looking, it seemed to hit a database error, so that’s what it said. Not very helpful.

I tried the site itself, and it was up. Retrying from FB didn’t fix it – it was now in the cache. Thankfully there’s a way of refreshing it:

Go to https://developers.facebook.com/tools/debug/

Enter the URL and it’ll show you the current cached preview image, and any errors.

Click the Scrape Again button to refresh it.

Neato.

Setting up a public facing webserver behind a Netcomm NF18ACV

Note: this will move your Broadband Router’s web-configuration to an unexpected port :8080, instead of the :80 your browser expects.

Navigate to Management | Access Control | Services then disable the WAN side HTTP service (why would you even expose this?), change the port for the LAN side to the Alternate HTTP port of 8080, and hit Apply/Save.

Navigate to Advanced Setup | NAT | Virtual Servers and hit Add. Select the correct interface, fill in the other details including the Web Server’s LAN address, ensure you’ve got Status: Enabled for the port forwarding, and hit Apply/Save.

Run up a trial HTTP server using something like
sudo python -m SimpleHTTPServer 80
and check for access from outside. Kill the server, because that isn’t safe for production use.

uBank: Sorry, Internet Banking is temporarily unavailable.

uBank is an Australian “Internet bank”, in such that they don’t have any branches. That’s fine, they can do everything except deal with cash. They’re owned by the NAB.

They have an app, which gets an absolute bollocking in the App Store. So people use the website instead. I need to do things with that account about once a month.

Close enough to half the time I try to login, I get the error message “Sorry, Internet Banking is temporarily unavailable.” with a page title of “Login Maintenance”. There’s no other kind of banking with these guys. The last time this happened was just before 4pm, which I believe is the close of transactions for that day. Why the hell would you do site changes in the middle of the day, and why just before the close of business? The NAB is a real bank, and I presume it doesn’t pull this kind of crap. They don’t even give a window (“Out until 14:30” or “Down for five minutes”). No post on their FaceBook website saying “there’s a planned downtime this afternoon” or “Sorry for the emergency outage, but rats were chewing on the coolant lines and that just isn’t okay. We humanely hit them with sticks until they stopped.”.

This is a very bad railroad.

YahooGroups sails into the sunset – export your data now

YahooGroups is mostly shutting down.

This official notice tries to describe what’s being removed and what isn’t, but succeeds in being a bit confusing: emails to groups will keep working, but “Conversations” and “Email updates” won’t.

My reading is you’ll still be able to send emails and they’ll be distributed – but nothing else will work.

But I’d also assume this is not a business they want to be in anymore, so even emails will probably be discontinued before too long.

There’s an option to download all your data: it’s accessible via this link: https://groups.yahoo.com/neo/getmydata

It took a week for it to be ready.

Then it took 5 goes for the download to actually work. It repeatedly conked out part way through.

When it finally worked, the result (for me) is a 1.6 Gb zip file with everything from (it appears) every group I’m in, including messages, files and everything else.

Inside the subdirectories for each group is:

  • files.zip
  • links.zip
  • medias.json – this seems to be metadata for the photos and attachments, below
  • messages.zip – looks to be mbox files with the entire archive of messages
  • photos_and_attachments.zip

I can’t see some of the more esoteric data from YG, such as Databases, Polls and Events. Export of those might have to be a manual process.

If you’re interested in getting your data, I’d get onto it now. It’s all scheduled to be wiped in mid-December, and the process may become even slower than a week.

2020-01-16: The deadline was extended to the end of January 2020.

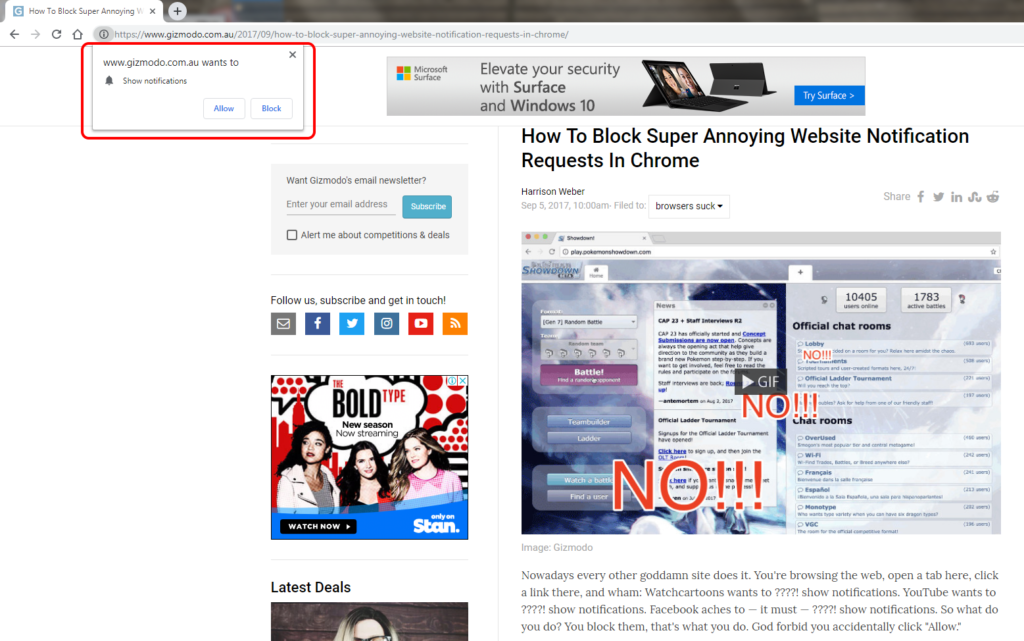
How to block notification requests in Chrome

Oh the irony.

Anyway, the steps:

  1. Go to Chrome Preferences
  2. Advanced
  3. Site settings (or “Content settings”)
  4. Notifications
  5. Click the “Ask before sending (recommended)” switch off. It should then say “Blocked”

Yeah it’s a counter-intuitive caption on that button. It implies that switching it off will just drown you in a sea of unwanted notifications without asking you.

But it seems to work.

Update 2023: It’s moved a bit, so now try:

  1. Chrome Settings
  2. Search for Site Settings
  3. Default behaviour: Choose “Don’t allow sites to send notifications”

If you use Firefox or Safari, this How To Geek article covers those. The article notes that Edge doesn’t currently have an option to turn them off for good.

I tried Firefox again

I used Firefox when it was initially released about 15 years ago, but migrated to Chrome a few years later.

This story made me think it was worth trying FF again: NYT: ‘Firefox Is Back. It’s Time to Give It a Try.’

A couple of weeks ago, I tried Firefox over a few days. Here’s what I found.

Tuesday

Once-off import of everything (including passwords) is easy: Switching from Chrome to Firefox

I’m trying out Firefox now on desktop and Android. Will see how I go.

So far I haven’t found a way of continuous synching of Firefox and Chrome without plugins.

Wednesday

On my desktops at home (Win7) and work (Win10), Firefox feels about as fast as Chrome, except for Gmail, but I think I’m seeing the effects of the new Gmail interface, which I switched to a day before switching browsers – this seemed slower than the old interface in Chrome as well.

Bringing bookmarks, passwords, etc over from Chrome was easy. Have synced most of them via a Firefox account (but not bookmarks, as I want the bookmarks toolbar to be different between home and work – I rarely use non-toolbar bookmarks)

It seems to run fine on my Android phone. Again, was able to sync via the Firefox account. Easy to set Android to open FF by default.

Possibly a bug in FF – on my work desktop, if I maximise the browser window on one of my monitors, the navigation all disappears. It works on the other monitor, and at home. — This is not a FF bug – Chrome, IE and Edge are all doing it. Probably be a graphics driver issue.

…at some stage a Windows Update came through and seemed to fix this.

Friday

One issue I’m seeing with Firefox: looking at Youtube, the options to embed a video have disappeared. Instead, the Share option will only let you send a Youtube message to somebody with the video link.

Tried Edge/Chrome on the same video, and they’re appearing. (It’s one of my own videos, so the option to allow sharing is definitely on).

So it seems Firefox appears to be doing something funny. I wonder if it’s trying to render a simplified (mobile-like) rendering of the page, though I can’t see an option for turning that off.

Eventually I found the Embed option. The navigation to it is totally different from within Chrome and Edge, making it difficult to find.

(Responsive Design Mode is off – looks like a handy option to have, actually)

Then I started to see similar issues on carsales.com.au… hmmm.

Tuesday

Well, I’m going back to Chrome, because:

  • Some quirks like the Youtube issue, and a few other local sites (perhaps the fault of the web designers, not the browser)
  • On my fast work PC, Firefox is good, but on my old desktop machine it seems a little bit sluggish compared to Chrome
  • I’ll keep FF on the work PC for my own development, but won’t use it as my usual browser.

For those sticking to Chrome but unhappy with the privacy defaults, there are a few tweaks that can be made, though who knows how effective they really are.

Happy browsing!

(I’m finally posting this just as news comes through of the big EU fine against Google. Interesting.)

Securely run a low memory/low CPU Minecraft server

If you’ve got next to no memory and CPU available to run a Minecraft server, don’t fret. Cuberite is what you’re after. At them moment, Cuberite isn’t bug-free, nor indiscernible from a genuine Minecraft server, but it’s quite usable – and instead of needing 4GB+ of RAM, it needs less than 300MB. And it needs next to no processing power: some people run Cuberite on their Raspberry Pi and have plenty of CPU available.

I would at this point go on about how this is a significant point of difference between C++ and Java, but Java optimizes for something different to C++.  I got into an interesting discussion with Cathy about this after reading a question someone had about what Java was trying to be good at. I used to think that VB was the new COBOL, but clearly Java is the new COBOL; those Java programs are going nowhere, they’re verbose and easy to understand and maintain.

A point to note: The Minecraft protocols are bandwidth heavy, I found if I wanted to run a server at home I’d be able to have one, perhaps two players. Thus is Internet in Australia. Instead I’ve dropped this onto a free AWS VPS instance and bandwidth is no problem.

Still, it’s a random piece of software off the Internet, so we’re going to give it its own user account for our own safety. Let’s install the software:

curl -sSfL https://download.cuberite.org | sh
sudo mv Server /usr/local/cuberite
cd /usr/local/cuberite

Cuberite allows configuration through a web interface.  We now enable webadmin.ini
[User:admin]
; Please restart Cuberite to apply changes made in this file!
Password=yourstrongpassword
[WebAdmin]
Ports=8080
Enabled=1

Port 8080 is the alternative html port (http/https).  You could cd into webadmin and run GenerateSelfSignedHTTPSCertUsingOpenssl.sh and get https serving, but your browser will barf on the certificate. Instead, let’s use a LetsEncrypt certificate, one that we installed earlier. First we make our one-line shell script for running the daemon:

sudo useradd -c "Cuberite server" -f -1 -M -r cuberite
chown -R cuberite:`whoami` /usr/local/cuberite/
sudo nano /etc/init.d/cuberite.sh

#!/bin/sh
### BEGIN INIT INFO
# Provides: cuberite
# Required-Start: $local_fs $network
# Required-Stop: $local_fs
# Default-Start: 2 3 4 5
# Default-Stop: 0 1 6
# Short-Description: cuberite
# Description: Cuberite server, a Minecraft server lookalike
### END INIT INFO
cd /usr/local/cuberite
sudo -u cuberite /usr/local/cuberite/Cuberite -d &

Next we set it going when the box starts up:

sudo chmod +x /etc/init.d/cuberite.sh
sudo update-rc.d cuberite.sh defaults

Before we can go to the website we need to allow user cuberite to get to the certificates:

sudo groupadd privkey_users
sudo usermod -aG privkey_users cuberite
sudo sudo chmod g+rx /etc/letsencrypt/live/
sudo sudo chmod g+rx /etc/letsencrypt/archive/
sudo chown root:privkey_users /etc/letsencrypt/archive/
sudo chown root:privkey_users /etc/letsencrypt/archive/example.com/
sudo chown root:privkey_users /etc/letsencrypt/archive/example.com/cert1.pem
sudo chown root:privkey_users /etc/letsencrypt/archive/example.com/chain1.pem
sudo chown root:privkey_users /etc/letsencrypt/archive/example.com/privkey1.pem
sudo chown root:privkey_users /etc/letsencrypt/archive/example.com/fullchain1.pem
sudo chown root:privkey_users /etc/letsencrypt/live/
sudo chown root:privkey_users /etc/letsencrypt/live/example.com/
sudo -u cuberite ln -s /etc/letsencrypt/live/example.com/cert.pem /usr/local/cuberite/webadmin/httpscert.crt
sudo -u cuberite ln -s /etc/letsencrypt/live/example.com/privkey.pem /usr/local/cuberite/webadmin/httpskey.pem

Changing these permissions doesn’t affect apache2’s ability to get them.
The reason we’ve used a group here is to allow both Cuberite and any other app (for example, exim) to access the private keys; just add any other user that needs to use the private keys to the privkey_users group.

Remember to punch a firewall hole for port 8080. Fire up Cuberite now:

sudo service cuberite restart

And check if that worked, there should be about one entry:

ps -aux | grep cuberitps -aux | grep cuberit

If not, you can check in the logs directory to see what’s wrong.

So now:

sudo lsof -i :8080
https://example.com:8080/

should be secure.  Note the https is mandatory, as your browser will use http if you fail to specify a protocol.

Trustworthy email: authentication using exim4, SPF, DKIM and DMARC

The email authentication technologies we’re about to implement are, according to the authentication authorities, all you need to be regarded as being from your domain when you send email, and someone else not being from your domain.  Effect: your emails can be considered trustworthy by email receivers who use these technologies. If they don’t use these technologies, they can’t tell.

At the very least, Google will be less likely to think your email is spam.

PTR record

A PTR record can be obtained from your host’s nameserver – it’s a reverse DNS record for your IP address. If the PTR record points at ec2-23-65-53-221.ap-southeast-2.compute.amazonaws.com rather than example.com (your domain), and you’re claiming to be sending mail from example.com, what’s the email recipient meant to think?

host 23.65.53.221

will tell you what the host for that IP is. Lodge a ticket with your hosting provider and get that PTR record changed to example.com. This might take about a day.

SPF record

Create a Sender Policy Framework record on your nameserver:

TXT @ "v=spf1 a mx -all"

This says “for my domain, I will only send email from IP addresses listed on the nameserver”.  Nameserver changes take time to propagate.

After your nameserver changes have propagated, you can go to https://dmarcian.com/spf-survey/ to check out if you got it right.

DKIM

DomainKeys Identified Mail is where things get more involved.  We’re doing this on a Debian Linux, like Ubuntu for exim4. We’re making our signing key 2048 bits, which is long enough to make life slightly unpleasant for us. Fortunately for you I’ve written a bash script that outputs the TXT record we need to create on the nameserver – because some nameservers (I’m looking at you, Gandi) can’t hold “long” strings – it’s broken into “small” strings:

sudo apt install openssl
cd /etc/exim4
sudo openssl genrsa -out dkim.private 2048
sudo openssl rsa -in dkim.private -out dkim.public -pubout -outform PEM
echo $(echo $(date -u +%Y%m%d && echo '.domainkey.example.com') | sed -e 's/[ ]//g' && echo $(echo ' TXT "v=DKIM1; p="' && echo $(grep 'PUBLIC KEY' -v dkim.public) | sed -e 's/[ ]//g' | fold -w200 | sed -e 's/\(.*\)/"\1"/g'))

which gives something like
20170419._domainkey TXT “v=DKIM1; p=” “MIIBIjANBgkqhkiG9w0BAQEFAAOCAQ8AMIIBCgKCAQEAvCNqU0Njd4YQ4e89T3FNc+uyOS2JwUqynGk7uwcSYHjIE2MGRuTxi56s4JgPKSnCVlBkJlUnXQHXFp2UGnLm8SADtjRMfWwpNxz6TmzXBpMnNZV1zvuoBBdcxh0Qg1TtCSACtWM6ehml0BmOHVA8Ippqj9iRlP2HMjuVMxZXewN9eJl”
“c6zsyOwQPvVKpJ+Rdvr+pPkDztAVTw7mNSeyy+TL6O/3L9sl7A19Yx8jLHKuGUh9LutVuv1VP16e7GwlnA3Zqn5C1jyY5Qvr2SEHZMcE3VzD7XKZtZWbpkGh+A5S15NrOH4k9tbVfNbjft6Y1jUJRTT+4DD0ZEVlr4zO+WQIDAQAB”

That all goes into one nameserver TXT record, spaces and all.  The world will join up the ” ” and get one big string. Note the bold number up there? That’s the selector. That a number needs to get larger with each new key.  Periodically you’re going to have to reissue your key because security.  You know what gets larger as time goes by?  The date.  Use the date.  If you screw up, use tomorrow’s date, etc.

Once you’ve got our public key out to the public via our public nameserver, we need to get exim to sign the payloads:

sudo nano conf.d/main/01_exim4-config_listmacrosdefs

After the line CONFDIR = /etc/exim4, add:

#DKIM loading
DKIM_CANON = relaxed
DKIM_DOMAIN = ${sender_address_domain}
DKIM_PRIVATE_KEY = CONFDIR/dkim.private
DKIM_SELECTOR = 20170419

and reload the mail server

sudo service exim4 restart

After an appropriate delay for nameserver propagation, use https://protodave.com/tools/dkim-key-checker/?selector=20170419&domain=example.com to check your work.
If that works out, mailto:check-auth@verifier.port25.com from example.com to ensure everything checks out:

echo -e "Test my DKIM plz\nMsg Body\n.\n\n" | mail -v check-auth@verifier.port25.com

DMARC

Domain-based Message Authentication, Reporting and Conformance is where the wheels can come off if you screwed anything up.  We’re going to set things up so that when you screw it up, computers scold you rather than putting your emails in the bin.

You will need to create two dmarc reporting accounts.  Servers will email you a (surprisingly detailed) report card on how you’re doing with your implementation. It’s best if these accounts are on the same domain, because technically you need to be or it’ll be ignored (Google will happily mail reports off-domain even if the other domain hasn’t said that’s okay).  Yours are dmarc_failures@example.com and dmarc_summary@example.com, according to the following nameserver entry:

_dmarc.example.com. 1800 IN TXT "v=DMARC1;p=none;pct=100;ruf=mailto:dmarc_failures@example.com;rua=mailto:dmarc_summary@example.com"

none is the consequence for screwing up. none is where we’ll start at, and see what the reporting records say to us.  After a while, you’ll be comfortable that everything is ticking along nicely, and you’ll up the consequent to quarantine (shove it in spam) or reject (burn it).

After your nameserver changes have propagated, you can go to https://dmarcian.com/dmarc-inspector/ to check out if you got it right.

As a human, to read the records sent to you, upload the files to https://dmarcian.com/dmarc-xml/

Making a captcha deamon for spamgourmet installations

For those of you following along at home, this is part of a cookbook style instruction set for getting spamgourmet going, but because of screwed up permission logic I can’t post this section there.

The captcha is for validating humanity when creating spamgourmet accounts. We’re going to limit what parts of the OS it can tromp over:

sudo useradd -c "captcha server for spamgourmet" -f -1 -M -r captcha
sudo /bin/mkdir -p /var/www-spamgourmet/captchasrv/
sudo chown -R captcha /usr/local/lib/spamgourmet/captchasrv/
sudo chown -R captcha /var/www-spamgourmet/captcha

Now we make our one-line shell script for running the daemon

sudo nano /etc/init.d/captcha.sh

#!/bin/sh
### BEGIN INIT INFO
# Provides:          captchasrv
# Required-Start:    $local_fs $network
# Required-Stop:     $local_fs
# Default-Start:     2 3 4 5
# Default-Stop:      0 1 6
# Short-Description: captchasrv
# Description:       captcha daemon for spamgourmet
### END INIT INFO
sudo -u captcha perl /usr/local/lib/spamgourmet/captchasrv/captchasrv.pl &

Next we get it going

sudo chmod +x /etc/init.d/captcha.sh
sudo update-rc.d captcha.sh defaults

And check if that worked, there should be about four entries:

ps -aux | grep captc

Now the captcha server will start whenever the computer starts.

Installing a secure Apache webserver to run Perl

So, you want to run Perl on the web, because it’s the 90s all over again. You want HTTPS, because… no, there’s no because.  You want HTTPS.  Who wouldn’t?  Here’s what you do on a Debian Linux such as Ubuntu:
sudo apt-get install apache2 libapache2-mod-perl2
mod-perl is an Apache module that allows Perl programs to be executed from Apache.

Our goal is to get /var/www/html/index.pl running at http://www.example.com/index.pl:

#!/usr/bin/perl
print "Hello World"

Disable the default Apache virtual host:

sudo a2dissite 000-default.conf

Create an example.com.conf file in /etc/apache2/sites-available with your text editor, replacing instances of example.com with your own domain name in both the configuration file and in the file name /etc/apache2/sites-available/example.com.conf

<VirtualHost *:80>
     ServerName example.com
     ServerAlias www.example.com
     ErrorLog ${APACHE_LOG_DIR}/error.log
     CustomLog ${APACHE_LOG_DIR}/access.log combined
     <Directory /var/www/>
              Options +ExecCGI -MultiViews +SymLinksIfOwnerMatch
              AllowOverride None
              AddHandler cgi-script .pl
              Require all granted
     </Directory>
</VirtualHost>

<IfModule mod_ssl.c>
<VirtualHost *:443>
     ServerName example.com
     ServerAlias www.example.com
     ErrorLog ${APACHE_LOG_DIR}/error.log
     CustomLog ${APACHE_LOG_DIR}/access.log combined
     <Directory /var/www/>
              Options +ExecCGI -MultiViews +SymLinksIfOwnerMatch
              AllowOverride None
              AddHandler cgi-script .pl
              Require all granted
     </Directory>
</VirtualHost>
</IfModule>

If you have multiple sites, you’ll want to do things with DocumentRoot to isolate them from each other. But that’s for another post.

You might add in DirectoryIndex /index.pl to make http://www.example.com/ execute your program.

The Directory section above allows you to isolate executable code from served code, which is good practice. For this example we’re dumping the executable in with everything else, which is questionable.

Repeat this process for any other domains you host.

sudo a2ensite example.com.conf
sudo ln -r -s /etc/apache2/sites-available/example.com.conf /etc/apache2/sites-enabled/example.com.conf
sudo service apache2 restart

Punch holes in your firewall for ports 80 and 443.  Navigate to http://www.example.com/index.pl to check all is okay. You ought to see Hello World displayed for your website.

Having security used to be a pain.  SSL certificates signed by a recognised CA cost money, and then you’d have to keep them up to date, and there wasn’t process automation, so you’d do all that stuff by hand.  LetsEncrypt address all these problems, handing out free certificates and scripted everything.

Now it’s time for the S part of HTTPS:
sudo add-apt-repository ppa:certbot/certbot
sudo apt-get update
sudo apt-get install python-certbot-apache
sudo certbot --apache

certbot renew
If that works, we’ll automatically renew our 90-day certificates every month:
echo '@monthly root /usr/bin/certbot renew >> /var/log/letsencrypt/letsencrypt-auto-update.log' | sudo tee --append /etc/crontab

Done.  You’ll never have to worry about certificates again. Now alter your Apache sites-available file (look in /etc/apache2/sites-available/) to include the (optional) redirect HTTP to HTTPS and the mandatory location of the SSL certificates:

<VirtualHost *:80>
....
# Only allow HTTPS
RewriteEngine on
RewriteCond %{SERVER_NAME} = example.com
RewriteRule ^ https://%{SERVER_NAME}%{REQUEST_URI} [END,QSA,R=permanent]
</VirtualHost>

<IfModule mod_ssl.c>
<VirtualHost *:443>
...
SSLCertificateFile /etc/letsencrypt/live/example.com/fullchain.pem
SSLCertificateKeyFile /etc/letsencrypt/live/example.com/privkey.pem
Include /etc/letsencrypt/options-ssl-apache.conf
</VirtualHost>
</IfModule>

Now make the secure version live, and in the process the insecure one… shy? When a request is made for a http page, like http://example.com/index.html, the response will be “Here’s https://example.com/index.html where what you asked for has moved to… forever!”:
sudo service apache2 restart
Now requesting http://www.example.com/index.pl ought to deliver you to https://www.example.com/index.pl

Install exim4 STARTTLS using a free LetsEncrypt certificate

Here we are on a Debian Linux, such as Ubuntu and we want to run a mail server. Exim4 is currently the most popular email server, but getting it up and working for free is a hassle – who wants to pay for a SSL certificate, on an ongoing basis? And then there’s the maintenance of the security of it – constant renewal, renouncing and re-installation of the certificates.

Wherever you see example.com, swap in your Fully Qualified Domain Name. That may be mail.example.com
It’s assumed you’re not logged in as root, but user ubuntu
Wherever you see 1.2.3.4, swap in your machine’s local IP address, from
ifconfig | grep "inet addr" | grep -v "127.0.0.1"

Security is all handled automatically by LetsEncrypt’s certbot. I’ll let you look that one up yourself. Run it up and get your certificate for example.com

Once you’ve got that handled, punch a hole in your firewall so that port 25 can get through from the outside world to your machine. Be aware: the outside world is filled full of botnets trying to hack into your machine.  After installing exim, keep an eye on the logs in /var/log/exim4/ for a while.

Let’s install exim4:
sudo apt-get install exim4
sudo dpkg-reconfigure exim4-config

  • pick “Internet site”
  • system mail name is example.com
  • IP address is 1.2.3.4 (the one returned by ifconfig, not the externally accessable one)
  • Other destinations: example.com
  • No relays
  • No smarthost
  • No Dial-on-Demand
  • mbox format (or whatever)
  • Split the files
  • ubuntu for postmaster mail

Check we’re now running a mail server:
sudo netstat -napt
should show
Proto Recv-Q Send-Q Local Address Foreign Address State PID/Program name
tcp 0 0 1.2.3.4:25 0.0.0.0:* LISTEN 25700/exim4

Now we have a mail server, the world needs to find it. Check your nameserver setting to ensure mail is destined this machine.  You probably want only one MX record.

Check the Internet can send mail to our server. After allowing for the appropriate propagation delay for your nameserver changes, use gmail or something to send an email to ubuntu@example.com – you should be able to read it by typing
mail

Now it’s time to enable MTA-MTA link encryption for secure transport of mail, by enabling STARTTLS on exim4 using our LetsEncrypt certificate
sudo nano /etc/exim4/conf.d/main/03_exim4-config_tlsoptions
Enable STARTTLS by adding/setting in the tlsoptions section:
MAIN_TLS_ENABLE = yes
MAIN_TLS_CERTKEY = no

before any of the IF shenanigans. Also add/replace pointers to the certificates:
tls_certificate = /etc/letsencrypt/live/example.com/fullchain.pem
tls_privatekey = /etc/letsencrypt/live/example.com/privkey.pem

The MAIN_TLS_CERTKEY = no entry fixes an exim4 log message
2017-04-16 09:13:24 TLS error on connection from your.home.ip.com (IcePlanet) [5.6.7.8] (cert/key setup: cert=/etc/exim4/exim.crt key=/etc/exim4/exim.key): Error while reading file.
You will see this when testing with swaks:
$ swaks -a -tls -q HELO -s example.com -au test -ap '<>'
=== Trying example.com:25...
=== Connected to example.com.
< - 220 your.vps.host.com ESMTP Exim 4.86_2 Ubuntu Sun, 16 Apr 2017 09:13:24 +0000 -> EHLO IcePlanet
< - 250-your.vps.host.com Hello your.home.ip.com [5.6.7.8]
STARTTLS
< ** 454 TLS currently unavailable *** STARTTLS attempted but failed -> QUIT
< - 221 your.vps.host.com closing connection
=== Connection closed with remote host.

Allow exim (which when running runs as user Debian-exim) to get to the certificates:

sudo groupadd privkey_users
sudo usermod -aG privkey_users Debian-exim
sudo sudo chmod g+rx /etc/letsencrypt/live/
sudo sudo chmod g+rx /etc/letsencrypt/archive/
sudo chown root:privkey_users /etc/letsencrypt/archive/
sudo chown root:privkey_users /etc/letsencrypt/archive/example.com/
sudo chown root:privkey_users /etc/letsencrypt/archive/example.com/cert1.pem
sudo chown root:privkey_users /etc/letsencrypt/archive/example.com/chain1.pem
sudo chown root:privkey_users /etc/letsencrypt/archive/example.com/privkey1.pem
sudo chown root:privkey_users /etc/letsencrypt/archive/example.com/fullchain1.pem
sudo chown root:privkey_users /etc/letsencrypt/live/
sudo chown root:privkey_users /etc/letsencrypt/live/example.com/

Changing these permissions doesn’t affect apache2’s ability to get them.
The reason we’ve used a group here is to allow both exim and any other app (for example, a secondary service that wants to use 8080 to serve up a configuration page) to access the private keys; just add any other user that needs to use the private keys to the privkey_users group.

These permission changes prevent the following error message in your log file:
2008-06-03 08:27:35 TLS error on connection from me.at.home.com ([1.2.3.4]) [5.6.7.8] (cert/key setup: cert=/etc/ssl/certs/server.pem key=/etc/ssl/private/server.key): Error while reading file.

Restart the service and the TLS settings ought to be working
sudo service exim4 restart
Test STARTTLS is working from another machine
swaks -a -tls -q HELO -s example.com -au test -ap '<>'
There shouldn’t be any obvious complaining.

Done!