How to to install the Crypt::Eksblowfish::Bcrypt module, and Crypt::Random

Have you gotten the error
Can't locate Crypt/Eksblowfish/Bcrypt.pm in @INC (you may need to install the Crypt::Eksblowfish::Bcrypt module)
and wondered what to do? Wonder no more!

sudo apt install libcrypt-eksblowfish-perl

and perhaps

sudo apt install libdigest-bcrypt-perl

What about
Can't locate Crypt/Random.pm in @INC (you may need to install the Crypt::Random module)
Easy!

sudo apt install unzip make gcc
wget http://search.cpan.org/CPAN/authors/id/I/IL/ILYAZ/modules/Math-Pari-2.01080900.zip
cd Math-Pari-2.01080900/
perl Makefile.PL
sed -i 's/CLK_TCK/CLOCKS_PER_SEC/g' pari-2.1.7/src/language/init.c
make
make test
sudo make install
cd ..
wget http://search.cpan.org/CPAN/authors/id/V/VI/VIPUL/Crypt-Random-1.25.tar.gz
tar zxvf Crypt-Random-1.25.tar.gz
cd Crypt-Rando1.25.tar
perl Makefile.PL

Easy! Only takes a few hours if you don’t know what you’re doing.

Installing a secure Apache webserver to run Perl

So, you want to run Perl on the web, because it’s the 90s all over again. You want HTTPS, because… no, there’s no because.  You want HTTPS.  Who wouldn’t?  Here’s what you do on a Debian Linux such as Ubuntu:
sudo apt-get install apache2 libapache2-mod-perl2
mod-perl is an Apache module that allows Perl programs to be executed from Apache.

Our goal is to get /var/www/html/index.pl running at http://www.example.com/index.pl:

#!/usr/bin/perl
print "Hello World"

Disable the default Apache virtual host:

sudo a2dissite 000-default.conf

Create an example.com.conf file in /etc/apache2/sites-available with your text editor, replacing instances of example.com with your own domain name in both the configuration file and in the file name /etc/apache2/sites-available/example.com.conf

<VirtualHost *:80>
     ServerName example.com
     ServerAlias www.example.com
     ErrorLog ${APACHE_LOG_DIR}/error.log
     CustomLog ${APACHE_LOG_DIR}/access.log combined
     <Directory /var/www/>
              Options +ExecCGI -MultiViews +SymLinksIfOwnerMatch
              AllowOverride None
              AddHandler cgi-script .pl
              Require all granted
     </Directory>
</VirtualHost>

<IfModule mod_ssl.c>
<VirtualHost *:443>
     ServerName example.com
     ServerAlias www.example.com
     ErrorLog ${APACHE_LOG_DIR}/error.log
     CustomLog ${APACHE_LOG_DIR}/access.log combined
     <Directory /var/www/>
              Options +ExecCGI -MultiViews +SymLinksIfOwnerMatch
              AllowOverride None
              AddHandler cgi-script .pl
              Require all granted
     </Directory>
</VirtualHost>
</IfModule>

If you have multiple sites, you’ll want to do things with DocumentRoot to isolate them from each other. But that’s for another post.

You might add in DirectoryIndex /index.pl to make http://www.example.com/ execute your program.

The Directory section above allows you to isolate executable code from served code, which is good practice. For this example we’re dumping the executable in with everything else, which is questionable.

Repeat this process for any other domains you host.

sudo a2ensite example.com.conf
sudo ln -r -s /etc/apache2/sites-available/example.com.conf /etc/apache2/sites-enabled/example.com.conf
sudo service apache2 restart

Punch holes in your firewall for ports 80 and 443.  Navigate to http://www.example.com/index.pl to check all is okay. You ought to see Hello World displayed for your website.

Having security used to be a pain.  SSL certificates signed by a recognised CA cost money, and then you’d have to keep them up to date, and there wasn’t process automation, so you’d do all that stuff by hand.  LetsEncrypt address all these problems, handing out free certificates and scripted everything.

Now it’s time for the S part of HTTPS:
sudo add-apt-repository ppa:certbot/certbot
sudo apt-get update
sudo apt-get install python-certbot-apache
sudo certbot --apache

certbot renew
If that works, we’ll automatically renew our 90-day certificates every month:
echo '@monthly root /usr/bin/certbot renew >> /var/log/letsencrypt/letsencrypt-auto-update.log' | sudo tee --append /etc/crontab

Done.  You’ll never have to worry about certificates again. Now alter your Apache sites-available file (look in /etc/apache2/sites-available/) to include the (optional) redirect HTTP to HTTPS and the mandatory location of the SSL certificates:

<VirtualHost *:80>
....
# Only allow HTTPS
RewriteEngine on
RewriteCond %{SERVER_NAME} = example.com
RewriteRule ^ https://%{SERVER_NAME}%{REQUEST_URI} [END,QSA,R=permanent]
</VirtualHost>

<IfModule mod_ssl.c>
<VirtualHost *:443>
...
SSLCertificateFile /etc/letsencrypt/live/example.com/fullchain.pem
SSLCertificateKeyFile /etc/letsencrypt/live/example.com/privkey.pem
Include /etc/letsencrypt/options-ssl-apache.conf
</VirtualHost>
</IfModule>

Now make the secure version live, and in the process the insecure one… shy? When a request is made for a http page, like http://example.com/index.html, the response will be “Here’s https://example.com/index.html where what you asked for has moved to… forever!”:
sudo service apache2 restart
Now requesting http://www.example.com/index.pl ought to deliver you to https://www.example.com/index.pl

Install exim4 STARTTLS using a free LetsEncrypt certificate

Here we are on a Debian Linux, such as Ubuntu and we want to run a mail server. Exim4 is currently the most popular email server, but getting it up and working for free is a hassle – who wants to pay for a SSL certificate, on an ongoing basis? And then there’s the maintenance of the security of it – constant renewal, renouncing and re-installation of the certificates.

Wherever you see example.com, swap in your Fully Qualified Domain Name. That may be mail.example.com
It’s assumed you’re not logged in as root, but user ubuntu
Wherever you see 1.2.3.4, swap in your machine’s local IP address, from
ifconfig | grep "inet addr" | grep -v "127.0.0.1"

Security is all handled automatically by LetsEncrypt’s certbot. I’ll let you look that one up yourself. Run it up and get your certificate for example.com

Once you’ve got that handled, punch a hole in your firewall so that port 25 can get through from the outside world to your machine. Be aware: the outside world is filled full of botnets trying to hack into your machine.  After installing exim, keep an eye on the logs in /var/log/exim4/ for a while.

Let’s install exim4:
sudo apt-get install exim4
sudo dpkg-reconfigure exim4-config

  • pick “Internet site”
  • system mail name is example.com
  • IP address is 1.2.3.4 (the one returned by ifconfig, not the externally accessable one)
  • Other destinations: example.com
  • No relays
  • No smarthost
  • No Dial-on-Demand
  • mbox format (or whatever)
  • Split the files
  • ubuntu for postmaster mail

Check we’re now running a mail server:
sudo netstat -napt
should show
Proto Recv-Q Send-Q Local Address Foreign Address State PID/Program name
tcp 0 0 1.2.3.4:25 0.0.0.0:* LISTEN 25700/exim4

Now we have a mail server, the world needs to find it. Check your nameserver setting to ensure mail is destined this machine.  You probably want only one MX record.

Check the Internet can send mail to our server. After allowing for the appropriate propagation delay for your nameserver changes, use gmail or something to send an email to ubuntu@example.com – you should be able to read it by typing
mail

Now it’s time to enable MTA-MTA link encryption for secure transport of mail, by enabling STARTTLS on exim4 using our LetsEncrypt certificate
sudo nano /etc/exim4/conf.d/main/03_exim4-config_tlsoptions
Enable STARTTLS by adding/setting in the tlsoptions section:
MAIN_TLS_ENABLE = yes
MAIN_TLS_CERTKEY = no

before any of the IF shenanigans. Also add/replace pointers to the certificates:
tls_certificate = /etc/letsencrypt/live/example.com/fullchain.pem
tls_privatekey = /etc/letsencrypt/live/example.com/privkey.pem

The MAIN_TLS_CERTKEY = no entry fixes an exim4 log message
2017-04-16 09:13:24 TLS error on connection from your.home.ip.com (IcePlanet) [5.6.7.8] (cert/key setup: cert=/etc/exim4/exim.crt key=/etc/exim4/exim.key): Error while reading file.
You will see this when testing with swaks:
$ swaks -a -tls -q HELO -s example.com -au test -ap '<>'
=== Trying example.com:25...
=== Connected to example.com.
< - 220 your.vps.host.com ESMTP Exim 4.86_2 Ubuntu Sun, 16 Apr 2017 09:13:24 +0000 -> EHLO IcePlanet
< - 250-your.vps.host.com Hello your.home.ip.com [5.6.7.8]
STARTTLS
< ** 454 TLS currently unavailable *** STARTTLS attempted but failed -> QUIT
< - 221 your.vps.host.com closing connection
=== Connection closed with remote host.

Allow exim (which when running runs as user Debian-exim) to get to the certificates:

sudo groupadd privkey_users
sudo usermod -aG privkey_users Debian-exim
sudo sudo chmod g+rx /etc/letsencrypt/live/
sudo sudo chmod g+rx /etc/letsencrypt/archive/
sudo chown root:privkey_users /etc/letsencrypt/archive/
sudo chown root:privkey_users /etc/letsencrypt/archive/example.com/
sudo chown root:privkey_users /etc/letsencrypt/archive/example.com/cert1.pem
sudo chown root:privkey_users /etc/letsencrypt/archive/example.com/chain1.pem
sudo chown root:privkey_users /etc/letsencrypt/archive/example.com/privkey1.pem
sudo chown root:privkey_users /etc/letsencrypt/archive/example.com/fullchain1.pem
sudo chown root:privkey_users /etc/letsencrypt/live/
sudo chown root:privkey_users /etc/letsencrypt/live/example.com/

Changing these permissions doesn’t affect apache2’s ability to get them.
The reason we’ve used a group here is to allow both exim and any other app (for example, a secondary service that wants to use 8080 to serve up a configuration page) to access the private keys; just add any other user that needs to use the private keys to the privkey_users group.

These permission changes prevent the following error message in your log file:
2008-06-03 08:27:35 TLS error on connection from me.at.home.com ([1.2.3.4]) [5.6.7.8] (cert/key setup: cert=/etc/ssl/certs/server.pem key=/etc/ssl/private/server.key): Error while reading file.

Restart the service and the TLS settings ought to be working
sudo service exim4 restart
Test STARTTLS is working from another machine
swaks -a -tls -q HELO -s example.com -au test -ap '<>'
There shouldn’t be any obvious complaining.

Done!

Cheap passport photos using The Gimp and 10c printing

Australian Passport requirements are specified by Border Force.  The step that’s most avoidably expensive is the generation of compliant photographic representation of the individual (at $17-$20 per person).

The fun part is that the published instructions talk about “face size” (the skin-visible bit of your head, so from your hairline down to your chin) needs to be between 32mm and 36mm; to allow for the vagueries of conversion we’re going to shoot for exactly 34mm.  The passport application form talks about “chin to crown measurement” being in this range, and the bit where you stick the photo on implies that the chin-to-hairtop has to fit in the image; which one will be enforced is up to the interviewing officer and may lead you to tears.  I ended up taking two scaled images and let the officer choose.  The top we’ll measure to I’ll call “head top”.

Take your appropriately posed and positioned photograph. Don’t crop too aggressively: there’s plenty of pixels in modern photographs, and you can’t add “more person” if you got the ratios wrong.

Load the photo into the Gimp.

Find out how many pixels there are from the chin to headtop by picking Tools | Measure and measuring as close to vertically as you can between these two features. I got 1573 on my image.

Whip out your calculator and divide this by 68% (34mm face height/50mm image height), getting you the number of pixels high your image needs to be to make 50mm – 2313 in my case. The width is 80% (40mm image width/50mm image height) of this number – I get 1850.  Photographs nowadays typically use square pixels.

Now for the image we’re going to paste into. Standard photographs are 6″x4″, or about 152mm x 101mm – let’s call it 150×100. So select File | New, with a size double the height of the cutout, and a width of triple the height of the cutout – mine was 4626 x 6939.

Now we’ll put some guidelines on to help us place accurately. Select Image | Print Size... and put in 6″x4″ (Once you put in the 6″, the 4 should magically fill itself in). Pick View | Show Grid and View | Snap to Grid. Select Image | Configure Grid... and set up a 5mm x 5mm grid. There should be a lot of 5mm boxes on your image now.

Switch to your photograph.

Now check Windows | Dockable Dialogs | Tools Options has got a dialog up, and pick Tools | Selection Tools | Rectangular Select. On the options dialog (which may need resizing so you can see all the options), check Fixed and pick Size from the accompanying drop-down. Enter the dimensions you’ve calculated.

Now select your face, and copy it. Switch to the new image, and paste you image. Position it, and paste in your face. You ought to fit three across, and two down. Six passport photos for 10c! Yay!

Suppose you’re doing two different faces on the one photograph (or more!). Once you’ve gotten as far as doing the calculations for the second image (what are the chances you’ll get the same framing of the face?) and then copying the face, stop. Instead of pasting it into the printable image, pick Edit | Paste As | New Image. Pick Image | Scale Image, ensure Width and Height are locked with a chain symbol, then enter the Height of your original face (2313 in my case). If everything is going hunky-dory, the calculated width will match the new width in the dialog. Press the Scale button, Select | All, copy the image and paste it into your printable image, then position appropriately.

Now, to print out you’ll need a JPEG. Select File | Export, type in a filename ending in .jpg and you’re set. Take to your local Officeworks/Harvey Norman, and 10c later you’ve got your Australian passport photos.

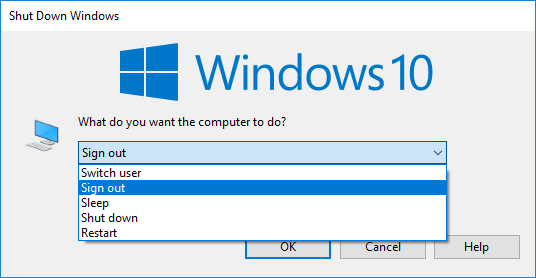
Windows 10 close desktop: default action

In previous versions of Windows, they made it easy to change the default power option to be Log Off. This is handy for me – we tend to leave our PCs on, but logged off most of the time (with the power settings such that they put themselves to sleep).

Not so in Windows 10. If you Alt-F4 (close window) on the desktop, it’ll default to Shut down.

Worse, they’ve renamed all the options so that you can’t use a letter as the initial for Log Off. S now stands for not just Switch User and Sleep, but also Sign Out and Shut Down!

Thankfully there is a way to change the default. It involves going into the Registry.

  • Go to: HKEY_CURRENT_USER\Software\Microsoft\Windows\CurrentVersion\Explorer\Advanced
  • If it doesn’t already exist, create a DWORD Start_PowerButtonAction
  • Defaults are as follows (in decimal): 1 = Sign out, 2 = Shut down, 4 = Restart, 16 = Sleep, 64 = Hibernate, 256 = Switch user

Beats me why they didn’t build that into the UI somewhere.

Unfortunately it doesn’t affect the Start / Power button.

For ease of use, we also created a prominent Log Off short cut on the desktop/Start menu, pointing to:

C:\Windows\System32\shutdown.exe -l

(That’s a lowercase L)

Logitech Harmony 650 universal remote

Logitech Harmony 650 universal remoteI bought myself a Logitech Harmony 650 universal remote, $59 at Officeworks (RRP $89.95).

The packaging and some of the promotional material says it replaces 5 remotes, but it’s had a firmware upgrade and now replaces 8, so I think it’s pretty good value.

Although Logitech sells a range of remotes, I decided $59 was a sweet spot for what I wanted to do. This model can’t control Bluetooth devices such as the Wii U, or those controlled via WiFi/LAN such as Sonos — you’ll need to spend up on a more complex model for that, but personally I couldn’t justify the $240+ investment.

To set it up you plug it into a PC/Mac and install a setup program which guides you through it. All pretty easy, and even works with my obscure no-name PVR.

Curiously it didn’t recognise my Panasonic Blu-ray player, but it made an educated guess as to what IR sequences would match, and that worked well.

It lets you set up Devices, then group them into Actions (eg Watch a Blu-ray: turn on the Blu-ray player, turn on the TV, switch it to AV, turn on the Receiver, switch it to HDMI1/Blu-ray).

The defaults for some of the actions are a bit odd, for instance the menu navigation for Watch a Blu-ray turned out to default to navigating the TV menus. This can be overridden to a more logical setting.

One issue I’ve noted: the TV takes a really long time to start up… easily 10-15 seconds to be ready for viewing. It looks like the remote doesn’t allow enough time before changing to the appropriate input/channel, and the TV misses this step. You can insert delays in some parts of Activity sequences, but it appears not here.

Clone to a bigger drive, and convert MBR to GPT

I wanted to partly upgrade Windows to a new drive.

Currently, Windows itself and Program Files are on C: drive, which is an SSD (which I meant to blog about in detail, but never got around to) and documents are on D: drive (which was the tricky bit of the SSD upgrade — to do it properly involves using SysPrep with an Unattend.xml configuration file that tells Windows that documents will live on D: not C:. This article describes it in detail.

Anyway that’s really irrelevant to the problem at hand, which is that D: drive had run out of space. Here’s a brief description of what I did:

  • The new drive is a 4 Tb drive, replacing a 1 Tb drive.
  • Plug the new drive in, use Clonezilla to clone the old D: onto the new drive. Following the detailed instructions, this all went pretty smoothly.
  • But… the catch is the old drive was formatted in MBR, which has a limitation of 2 Tb. For beyond that, you need GPT.
  • I looked around for tools to convert the drive. It’s easy if you’re prepared to wipe it, but I wanted to preserve the data I’d just moved across. Finding ways to do it without wiping everything was tricky, but I settled on the free version of Minitools Partition Wizard — this has an easy-to-understand interface, and did the job
  • Once that MBR is converted to GPT, you can enlarge the partition to make the whole drive available.
  • Unplug the old drive, move the new one into the same slot as the old (this is on a Mac Pro booting in Windows Bootcamp) and it works. Done!

PS. Similar exercise afterwards shuffling the OS X partition from a 320 Gb drive to the old 1 Tb. That required GParted, as it seems the GPT partition couldn’t be expanded due to a formatting issue (which GParted helpfully offered to fix as it started up) and another small 600 Mb partition being in the way — not sure what it is, but it seems to be essential for booting OS X — GParted was able to move it to the end of the disk.

Viali VCCG90SS and VCCG60SS rangehood installation instuctions

As the current home reno project is a kitchen rebuild (walls added and removed, nothing left behind – it’s dramatically more than a remodel) the first step followed was to acquire all the appliances (constructing the kitchen and then finding the oven that you’ve got a very specific sized hole made for is “no longer available” would be… disappointing).

One of the acquisitions was two Viali VCCG90SS rangehood extractor units, one for each cooktop. Noise during operation, rated capacity and acquisition cost all seem acceptable. The instruction manual seems, at first glance, fabulous: large, clear font, line drawings giving unit dimensions, step-by-step installation images and all in a matte A4-sized, easy-to-read format.

When you actually read the instruction manual with the intent of following the instructions for installation, that’s when you run into some difficulties. Let’s be clear: I’ve installed a couple of ducted extractor fans in the past, so rangehoods are not some unknown quantity for me. This is not my first rodeo. I consider myself handy, I’ve installed kitchens from the ground up. I’ve spent quite some time puzzling over this booklet, I’ve searched the Interwebs, I’ve really battled with this.

I will now try to explain how the heck you’re meant to install this Viali rangehood, because the shipped instructions sure don’t. Perhaps I’ll do it via annotation. Continue reading

Install updates and shutdown actually means start updating, then shutdown part way through

Last night my laptop said it wanted to install updates. So when I’d finished using it, I chose “Install Updates and Shutdown”, thinking it would be all finished and ready to go in the morning, right?

Wrong. When I started it back up this morning, it proclaimed that it was 1% through the updates, and “This will take some time.”

It took almost an hour to get through everything, but finally it got to the log on screen.

At that point I had to do something else, so I shut it down again. Later I booted it back up, logged on, and … more delay, as it went through a protracted “Getting things ready” phase.

Maybe this is a rarity given this is apparently the Windows 10 “Anniversary Update“, which brings a whole bunch of new functionality — none of which, so far, I think I actually need.

But the lesson for next time is to use “Update and Restart” (which truly is something Windows 8 and 10 have over Windows 7) rather than “Update and Shut down”, which clearly doesn’t do what I thought it would do.

Compress PDF files

Just a quick mention of a cool online tool I found…

I was about to email off a PDF (that I hadn’t created myself) to a discussion list when I noticed it was 6 Mb… which seemed a tad excessive.

Digging around I found SmallPDF, which can shrink them down. It got down to 1.2 Mb, with no noticeable loss of detail/fidelity.

SmallPDF is free for two files per hour, with no watermarks, or USD$6 a month for unlimited, and they have a few other related PDF functions such as file conversions.

Worth a look if you need to do something like this.

LG TV insists on turning itself off

We’ve got an LG TV being used in the office for displaying system information from a Raspberry Pi plugged into the back. The Pi is powered via USB from the TV.

We’ve used the timer to get it to switch on at 6am on weekdays, off at 5:45pm, reflecting the hours people are in the office.

It was consistently switching itself off at the wrong time, exactly two hours after it came on.

Turns out it’s a long-running bug in LG televisions.

In the forum, some found if they could get into the service menu, they could remove the 2 hour sleep setting.

Others found setting it to “hotel mode” would disable all timers – in our case this would waste a lot of power though.

New laptop – bloatware to remove

My old laptop was old when I got it, and I just realised that was four years ago. I tried to breathe a little more life into it by putting Linux on it… with some success, but I’ve got some stuff I need Windows for, and that crawls along these days.

So I bought a new cheap laptop, for web and email use (definitely not an attempt at a desktop replacement)… a Lenovo B41-30.

Vital stats: A$299 (which seems to be an okay price; apparently it’s $100 off) from Centrecom. 14 inch screen. Celeron N3050, 1.6 GHz, 2 cores. 500 Gb hard drive. Intel graphics. Windows 10 (x64).

Only 2 Gb RAM, but I’ve paid A$35 for a 4 Gb stick – why wouldn’t you? Unfortunately it only likes alike sticks in the two slots, so the original 2Gb had to come out. Perhaps I might put another 4 in there to make it 8. You can always do with more RAM, right?

Anyway, after setting it up, here’s the bloatware I’ve removed:

  • BT Locker – locks your computer if your phone is too far way, using Bluetooth I assume
  • Cyberlink Power2Go – for ripping CDs and DVDs… not actually very useful on a laptop with no optical disc player.
  • PowerDVD – DVD/media player – ditto.
  • McAfee LiveSafe
  • AppExplorer – recommends apps to install – all I want on this thing is the basics. I certainly don’t want it being clogged up with extra apps.
  • Lenovo Solution Center
  • Lenovo ReachIt
  • Lenovo ShareIt

That’s all for now. It’s running at an acceptable speed.