
As the current home reno project is a kitchen rebuild (walls added and removed, nothing left behind – it’s dramatically more than a remodel) the first step followed was to acquire all the appliances (constructing the kitchen and then finding the oven that you’ve got a very specific sized hole made for is “no longer available” would be… disappointing).
One of the acquisitions was two Viali VCCG90SS rangehood extractor units, one for each cooktop. Noise during operation, rated capacity and acquisition cost all seem acceptable. The instruction manual seems, at first glance, fabulous: large, clear font, line drawings giving unit dimensions, step-by-step installation images and all in a matte A4-sized, easy-to-read format.
When you actually read the instruction manual with the intent of following the instructions for installation, that’s when you run into some difficulties. Let’s be clear: I’ve installed a couple of ducted extractor fans in the past, so rangehoods are not some unknown quantity for me. This is not my first rodeo. I consider myself handy, I’ve installed kitchens from the ground up. I’ve spent quite some time puzzling over this booklet, I’ve searched the Interwebs, I’ve really battled with this.
I will now try to explain how the heck you’re meant to install this Viali rangehood, because the shipped instructions sure don’t. Perhaps I’ll do it via annotation.
Do not remove any of the blue film until the unit is completely installed. The film is to protect the stainless steel from scratches and fingerprints.
1. The cooker hoods should be placed at a distance of 65—75cm from the cooking surface for best effect. The minimum distance between the supporting surface for the cooking vessels on the hob and the lowest part of the range hood is to be 65cm. When the range hood is located above a gas appliance, this distance may be reduced to 60cm to align with the AGA code. See Pic 1.
Pic 1 (reproduced below) shows a profile view of a female standing at a cooktop, with some kind of rectangle (which is presumably the triangular rangehood) and a level line that makes it unclear if the underside, the topside of the leading edge, or some midpoint is meant to be somewhere in that 65-75cm range. I chose the underside.
Seems straightforward, right? Remember in picking the height to consider: when you bend over the cooktop to inspect the contents of a pot, what part of your head you want to bash against the hood? Your nice thick forehead, or somewhere where the blood and bruising won’t show up but is more likely to result in skull fractures? I chose forehead, but your choice may vary.
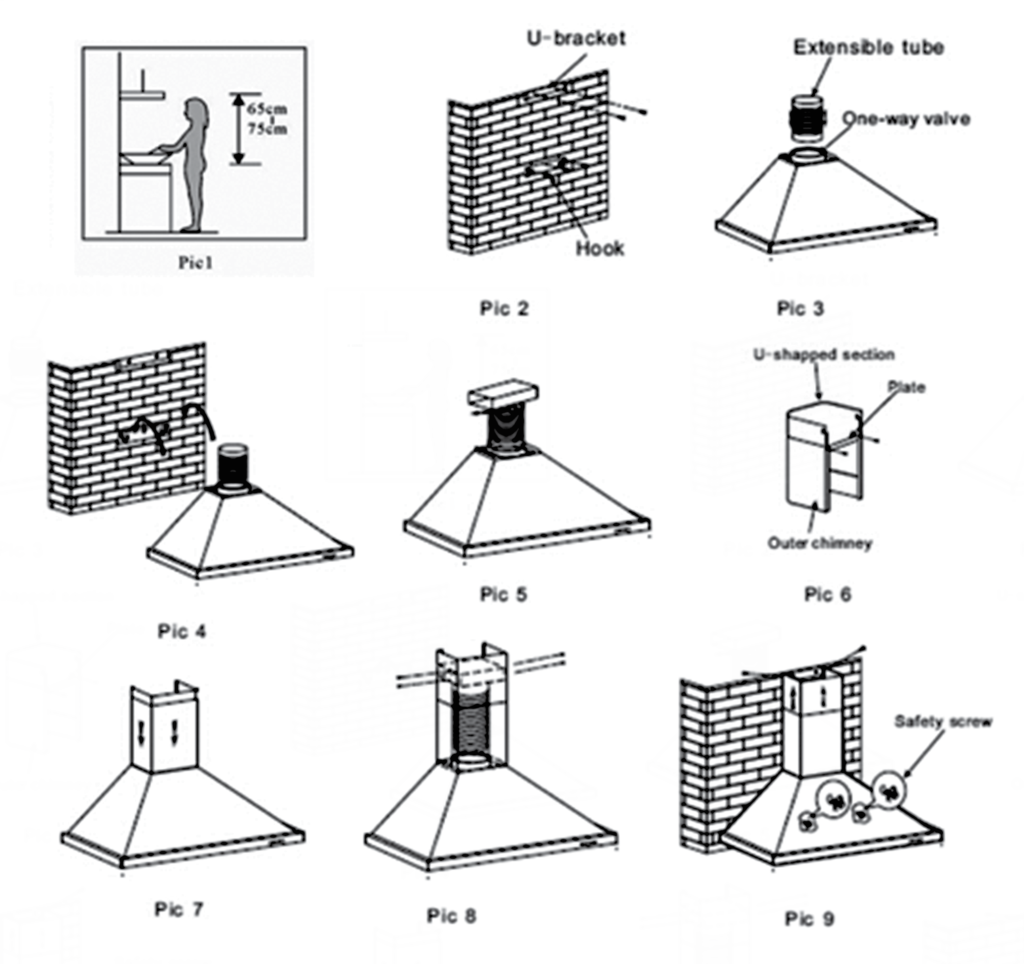
2. Install the hook on a suitable place once the installation height is fixed, and keep it in line. The fixed position of the inside chimney bracket is the place of chimney. See Pic 2.
Okay, so some terminology here: The shiny stainless steel boxes that slide in and out of each other are the two chimney components. No doubt you found those with no problems. The chimney is purely decorative and most of the work of the installation. The chimney has two parts: the inner chimney, which on its sides has vent-like holes at the top, and the outer chimney, which on its sides has a couple of holes at the very bottom to attach it to the cooker hood – the triangular box with a built-in fan. The inner chimney moves within the outer chimney in a telescoping action which allows the chimney to adjust to a range of distances between the ceiling and the cooker hood.
The hook that’s mentioned actually comes with the fan, but it’s hidden. Not inside the hood, that’s where I looked first. It’s taped inside one of the polystyrene packing pieces. I was actually searching the Bunnings webside for rangehood mounting hardware thinking this thing didn’t have any, when I knocked one of the foam pieces and noted it was surprisingly heavy. That’s where all the mounting hardware was hidden. The hook is a pair of hooks, or a hanger.
The inside chimney bracket is a U-shaped bent bit of metal with a strengthening deformity pressed into it. This bracket allows the inside/top part of the chimney to be attached to the wall. That part of the chimney isn’t attached to the outside/bottom part of the chimney in any way. Your chimney is going to stop at a horizontal surface at some point, I’m going to call it the ceiling.
You’ll notice on page 12 of the instruction manual, fairly detailed dimensions are given. Very handy for your CAD design (BTW, the inside lip is 25mm from the edge). You’ll also notice that the 60cm and 90cm unit have the same height, so the vertical positioning of the hanger is the same for a given benchtop-to-underside distance: 327mm as measured with a tape measure. But no, that number is not included in the instructions, as it would aid installation.
I’m going to translate this step into English:
At 327mm above the desired height of the underside of the rangehood, mark a perfectly level line. On this line, mark the left-right centre of where you want the rangehood. Centre the hanger’s middle hole on this centre point and mark the left and right holes for the hanger. Drill holes as marked, then affix the hanger to the wall using the supplied plugs or other means to securing the long screws firmly in the wall. Note the hanger permits a little slop in horizontal positioning.
At exactly 227mm below the ceiling, mark a perfectly level line. On this line, mark the left-right centre of where you want the rangehood. 53mm either side of this mark for holes, drill and affix the Inside Chimney Bracket to the wall using the supplied plugs or other means to securing the long screws firmly in the wall. Note the Inside Chimney Bracket permits ±10mm slop in horizontal positioning until firmly fixed to the wall. Ensure sufficient clearance either side to screw the small screws into the bracket.
See? Easy when you can read English. The wall is depicted in Pic 2 as being made from brick, but the supplied plugs aren’t designed for brick, they’re for plasterboard and I’ve never had much success with using that style in their designed role. Try plasterboard plug screws instead.
The correct orientation of the Inside Chimney Bracket seems to be holes to the top, as it allows you to rest the chimney on the bracket with about an inch of space between the chimney and the ceiling; in the other orientation you push the chimney to the ceiling and then screw the screws in, which may cause cursing.
Cornice to the left and right of the chimney may block screwing the short screws in; inspect and evaluate; it’ll probably be fine.
4. Put the cooker hood on the hook. See Pic 4.
Just like it says. Hang about, where’s step 3? Well, these steps are sort-of out-of-order, what with your power cord and all…
Hang the cooker hood on the hanger. Remove the filters and put them aside for later reinsertion. Mark the wall where you will screw it in to secure it against horizontal movement. Remove the hood. Drill the holes and line with supplied plugs or other means to securing the long screws firmly in the wall. Hang the hood on the hanger again.
3. Fix one-way valve on the hood and connect any ducting to the one-way valve. See Pic 3.
Ah, any ducting. If you’re not ducting this, you deserve to catch fire. You can get ducting kits at most places that supply the rangehoods, expect to pay as much as a couple of hundred bucks. You’ll need a 150mm ducting kit. Why ducting isn’t supplied is a mystery…
The one-way valve is a black plastic butterfly valve, found on the top of the hood and held in place during shipping with a piece of sticky-tape. “Fix” means “Remove the tape.”
So, connect any ducting means a whole slew of work, involving punching holes through walls or ceilings and roofs (don’t vent flammable cooking grease into your roofspace, vent to outside). These activities are beyond the scope of this post.
One of the things that you’ll be doing in this step is running the power cord up through the ceiling to a power point you had installed there earlier. Yes, a power point in your roofspace. The chimney hides both your power cord and the ducting that you’re installing behind a pretty metal facade. Presumably you might be able to fit a power point behind the chimney, with the point arranged so that the projecting plug fits and doesn’t displace the ducting; you might even use a recessed power point for that. But a fair bit easier to have the power point in the roofspace.
Remove sticky tape from black butterfly valve. Plug in power cord. Connect previously installed 150mm ducting to the black butterfly valve.
5. Use clamp to fix the T-piece valve on the ducting. See Pic 5.
This is some kind of thing from “optional extras” and you don’t have it. Ignore.
6. Fix plate on the outer chimney, and be sure that the inside chimney can be adjusted
the height in it freely, See Pic 6.
The outer chimney plate is a bit of metal to help hold the chimney square. Its holes are not tapped, so be prepared for hard work and cursing as your small screws tap the plate’s holes.
However, I would advise against this step. The screw heads will protrude beyond the flush back of the chimney, requiring you to either make a depression in the wall, or live with a kinked chimney. Also: physics (see below).
7. Install the chimney and screw the T-piece metal outlet to the inside chimney, See Pic 7 and 8.
Ignore the talk of a T-piece metal outlet. That’s for losers who buy optional extras.
So this just isn’t going to work. How the heck are you meant to do this with both the duct attached and the outer chimney plate attached? Can’t, not possible: something about physics. Presumably at this point you now remove the outer chimney plate from step 6 and live with a not-square chimney. The humanity.
Use small screws to screw the holes on the bottom of the Outer Chimney to the top of the cooker hood.
8. Adjust the height of the inside chimney to the position of the inside chimney bracket and fix on it by screw, after adjusting the position, fix the body with safety screw. See Pic 9.
Be aware the holes aren’t threaded, so you’ll be tapping the threads while screwing in the short screws.
Lift the Inside Chimney to the ceiling, use short screws to attach the Inside Chimney to the Inside Chimney Bracket. Secure the hood to the wall by screwing large screws into the holes made in step 4. Put the filters back in.
NOTE: The two safety vents are positioned on the back casing, with diameter of 6mm.
T-piece valve and ducting are optional extras.
I have no earthly idea what this means. Except the optional extras bit; that means you didn’t get those things.
WARNING: Failure to install the screws or fixing device in accordance with these
instructions may result in electrical hazards.
Electrical hazards means having a 15kg box fall on you, possibly leaving behind a trailing live wire. I’m more worried about the 15kg box with razor-sharp edges. Besides, you’ve got a safety switch so quit whining.
So that’s it.
Once installed, you’re going to want to tidy up the edges with gap filler. At some point along the way you decided to remove the protective blue film, probably before things started getting pinned to walls. You might have needed to warm the blue film with a hair dryer if things weren’t going your way.
Am I the only one who struggles with instruction manuals?
Absolutely spot on. I read your post as if I was you. I too spent some time trying to work out the instructions of this rangehood, steps 5, 6, 7 & 8 had me stumped.
Thank you very much for this post
S,o I haven’t started any part of the install yet. Do I take it back for refund or are they all like this?
I purchased a Range Hood from the good guys. The appliances keeps switching itself on and off. It is possible to buy replacement switches for the unit?
Well said, and thanks for your clarification on so much of it. It’s frustrating that either the fools that write the instructions to install have no communication with engineering, or are translated and printed locally i.e. China. I’m an installer of kitchens, builder, bathroom renovator, and mechanic by trade, etc so have a vast grasp on many things. Yet these instructions and process make no sense! Thanks for clearing it up!
Great post but I’d like to know what you think of the product? Does it work well, is it quiet etc. Looking for good or bad feedback. I like the look of them. Thanks